This is something very interesting to try out. We ignore waste materials, but just invest sometime to think on any creative things that you couls make out of waste.
Here is something that I did try. Some waste dried branches that I got and it turned out to be so beautiful after having a bits of paper work on it.
Materials:
1. Dried Branches
2. Colourful Crape paper
3. Green Crape paper
4. Varnish
How to make it:
1. Remove leaves from the branch and apply varnish all over the branch.
2. After its dried u can apply green colour on it or just keep it as it is to give the natural look.
3. Now cut small leaves out of green crape paper and stick on the branches.
4. Take the colourful crape paper and make flowers out of it and stick it onthe tip of the branches.
How to make flowers:
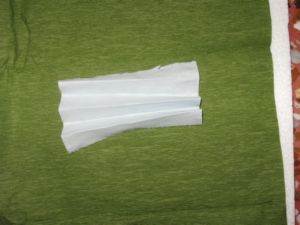
1. Take a piece of square paper. Using a dark pencil make circular doagram and cut the paper as it is drawn and cut the paper in the circular way itself. 2. Roll the paper fromn one end and finish it to the other by just rolling it.
3. You will see beautiful rose flowers.
Now arrange the flowers on the branches. This is how you make a beautiful branch of flowers.
Here is one for you.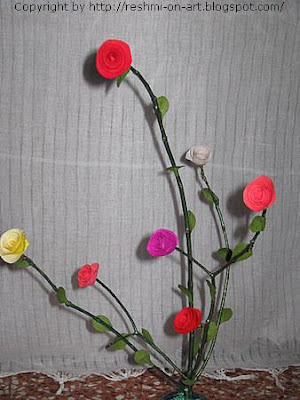
Labels: Craft
Lilly Flowers using Duplex paper. This duplex paper looks same as Crape paper, but duplex is much thick as compared to crape. Duplex paper got two sides with two different colours. So you can use either of the sides in anyways as per the colour requirement. Now will start with the making of Lilly Flowers.
Materials:
1. Duplex paper (any 2 colours)
2. Aluminium wire
3. Fevicol
4. Green Tape
5. Green Duplex paper (for leaves)
How to make it:
1. Firstly you have to make petals for flowers (5 petals for each flower). You have to cut the first petal in leaf shape and second petal smaller than the first (1 cm smaller to the bigger petal).
2. Suppose bigger petal is "Petal A" and smaller one is "Petal B". Now place the aluminium wire on "Petal A" as shown. 3. Apply fevicol over "Petal B" ans place it on "Petal A". Make sure the aluminium wire is placed properly as shown.
 4. Your first petal is ready. Similarly make 5 petals of same size and shape, so that the flowers look even in shape.
5. Now arrange the petals one after the other and arrange then like flowers with the help of the left out aluminium wire.(No need of thread or glue).
6. Cover the wire with green tape.
7. Make flowers with green duplex paper in the same way as petals. Green Duplex paper got 2 sides dark green and light green side, so a you can arrange the leafs in the same way.
Here is a beautiful basket of Lilly Flowers ready.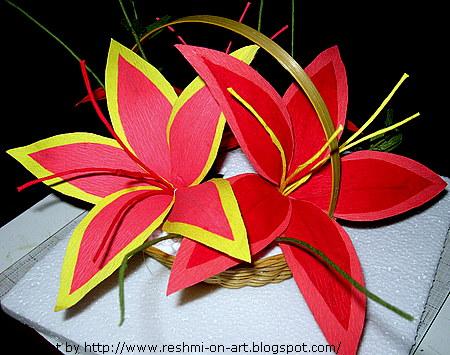
Labels: Craft
This is very interesting craft that anyone can try out and it hardly takes some time to complete. By completing this craft you can make any
Materials:
1. Matte Sheet (you'll come to know how the matte material is by seeing the picture below).
2. Pieces of thermocol
3. Satin ribbon
4. Fevicol
This is the Matte material.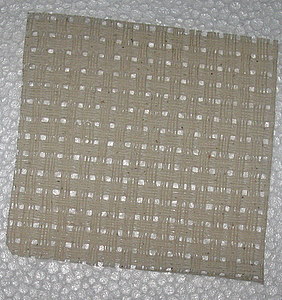 Method:
1. Take a piece of matte according to what you want to make. Suppose you are going to make a basket cut the required matte in proper height and width.
2. Cut thermocol according to the required size. Thermocol is used for the base of as us need to cut that in round shape if preparing for basket.
3. Then paste one end of the matte on the thermocol and press it slightly.
4. With the help of satin ribbon decorate it as required.
Its a very easy and interesting craft that anyone can make.
You can make lot of different things with the matte. For eg: Flower Basket, Bag, Pen Stand, Jewellery Box, Mobile Cover etc.
So try out all different varieties of things you think you can make with this matte.
Here is one that I tried out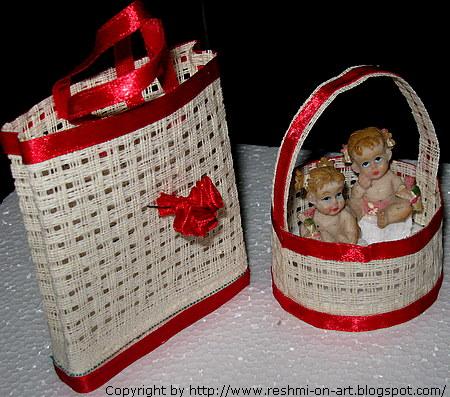
Labels: Craft
This is after sometime I am posting something, so I came up with something very interesting for you all.
Let us start with Tissue Paper Flower making. This is a bit time consuming but the after results are really amazing. Just try out yourself.
Materials required:
1. Tissue Paper (very thin paper)
2. Green Tape
3. Green Crape paper
4. Aluminium Wire
5. Fevicol
How to make:
1. Firstly arrange the tissue papers in proper order (8 approx).
2. Arrange the tissues and make it in such a way that it looks like a fan. See the sample below.3. Now tie the aluminium wire in the middle of the tissue and seperate each tissue very carefully.
4. As you start seperating each tissue from both sides you will get a beautiful flower ready.
5. Now cover the wire with the help of green tape.
6. As you have green crape papers make long leafs out of it and attach it along with the flowers.
7. To make it more beautiful you can colour the flowers, colours it only on the tip of the flowers so that it gives a natural shaded look.
In the same way you can make lot of such flowers out of tissue papers and arrange it properly.
Here is a beautiful Tissue paper Flowers ready.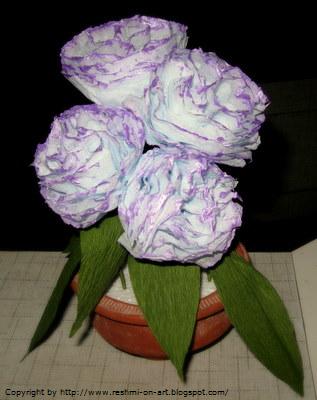
Labels: Craft
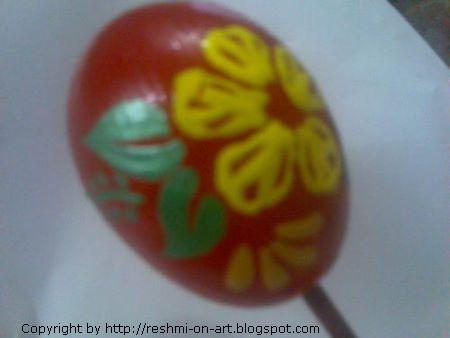
A very interesting thing that I would like to share with you all showing a very simple creativity by Egg painting. Any one can do this creative art but, with lot of patience. When doing egg painitng you need to be very careful so that the egg does not break. So hope you all ready to try out.
Materials:
1. Egg
2. Big needle
3. Colours
How to start with:
1. Puncture a small hole at the small and large end of egg with a big needle.
2. Place egg over a bowl and blow through the small hole until all of the inside is removed and rinse the shell with cold water and let it dry.
3. Now apply acrylic paint, select any colour and paint the egg with layer of colour and allow it to dry (approx 30 mins to dry).
4. Now its your own wish use your imagination and paint any design on the Egg.
5. If not good in making any design you can decorate the Egg using sequens golden threads some tiklis sparkles etc.
6. You can even make different birds and animal with some imagination according to the Egg shape.
So try out all possible things that you can.
Try this simple creativity and you will get amazing results.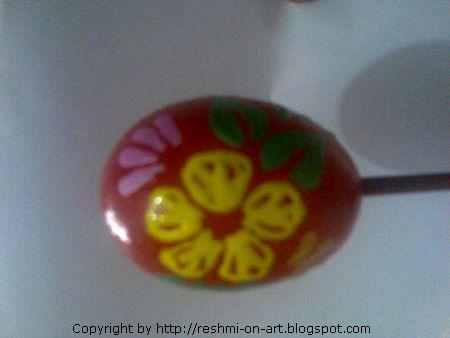
Labels: Painting
Leaf Painting is a unique kind of painting that can done on fabric or any materials that you would like to paint. Today here I'll let you know about Leaf painting on fabric material. Plain fabrics can be made attractive by leaf painting. This is a very simple painting even kids can try out. The painting can be made more attractive by using proper colours.
You need is:
1. Fabric Paint
2. Brush
3. Leaves (any size and shapes with thick vain)
4. Fabric that you wish to paint.
Procedure:
1. Firstly take leaves that you got make sure those are thick vained leaves to make the painting look very natural and colour the leaf on the back side completely with the chosen colour.
2. Now stick the leaves on the fabric and press well.
3. Leaves can be stuck according to your choice as it suits the fabric and now let the fabric dry for atleast 24Hrs.
4. After the painting gets dry do iron the design from back side so that the painting could last longer.
Note:
1. Before making the print on the good material it is better have a trial on a rough cloth.
2. You can stitch some sequences and beads to make the design more attractive.
Here are pictures for you.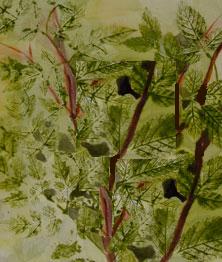
Labels: Painting
Bangle Painitng, yes a very simple thing if you gone through my other posts and got the idea of using colours and designs.
The same idea and technique should be used for painting a bangle.
Method:
1. You can easily get a broad wodden bangle from any accesories store.
2. Colour the bangle with any colour of your choice.
3. Then add any design of your choice over it.
Simple and you finised with a beautiful Bangle Painting.
Here is some for you.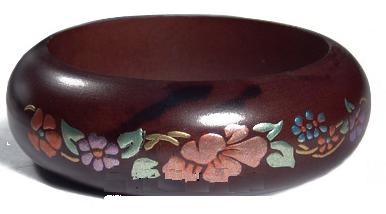
Labels: Painting
This time is a different painting. Its painting on Aluminium Sheet. Need lot of hard work to complete this painintg. This is fun and easy to do and let us start how to learn this beautiful painting.
Materials used for Metal Emboss painting.
1. Aluminium Sheet
2. Craft Paint Brushes
3. Trace of design
4. Golden anti rust liquid
5. Cotton
6. Kerosene
7. Ball pointed penEmbossing Tools: Method of Embossing:
1. Stick the trace of the design to the four corners of the aluminium sheet. Using the ball pen trace the design over the trace paper using pressure, so that the impression would look clear on the aliminium sheet.
2.Put dots around the design with a small hammer, you will get this hammer along with the Embossing tools. This dots around the figure that needs to be embossed will make the art look more attractive.
3. Keep a cushion on a flat surface and place the reverse side of the picture on it and emboss the picture by pressing hard with the embossing tools. The force used should be a bit more to get good results and when turned on the front side,the picture will be embossed (projected).
4. Now use golden anti rust on whole metal and make sure the background should look more dark than the actual picture.
5. To give lighter shade to the picture take some cotton and keep it inside the cotton piece of cloth and dip it in kerosene and rub it over the actual picture so that the excess anti rust solution will be removed.
Use proper tools according to the picture, be patient and get amazing results.
Here is a super Metal Emboss Picture.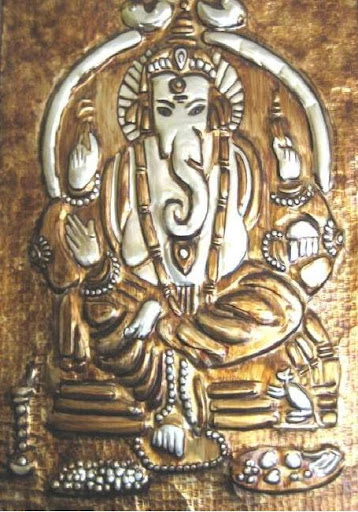
Labels: Painting
Stroke painitng is just like sweeping with colours. Its simple & fun to do. You will get great results even if you are painting for the first time. Stroke painintg is a very popular art. It is very attractive, less structured style that lends itself to freehand painting. Its actually different to pattern paintin that we were doing all this time. Stroke painting can be done on metal, plaster, glass, wood, fabric and ceramic surfaces. Its basically blending, shading, and highlighting all in ONE Stroke.
All you need is:
1. Colours
2. Surface on which you would like paint
3. Brush
Dip your brush on different colours and just give the srokes on ways you want and get beautiful colourful strokes. Try it out u'll be excited to see the results.
Here is a Stroke Painting for you.
Labels: Painting
Dry brush painting is something to do on a rough surface like canvas, wood. Dry brush painting gives the surface a scratchy effect. Dry brush the name itself says no water at all. In this painintg brush is just dipped in the colour and start painting directly.
Methods of painting:
1. The brush should be moved across the surface rapidly to get a natural effect.
2. The brush should be filled with paint.
3. When you start a stroke the start colour should be fresh on the first and then should be light as it goes further.
4. Dry Brush utilizes no water or medium other than paint to wet the brush.
5. Dry brush painting give a very good effect on wet surface.
6. A dark and light colour shades are a good combination for dry brush painting.
This is a beauiful Dry brush painting.
Labels: Painting
Yes again Stencil Art, but this time we'll learn Stencil painiting. Yes a bit different to earlier one (Stencil Making).
Materials:
*The same that is needed for stencil making*
1. Colours
2. Dry brush (Thick one)
In stencil painting the only difference is u should cut the stencil design in card paper instead of felt cloth. Once you are done with stencil cutting on card paper use any material u would like to paint, for eg: hard paper, felt cloth, cotton cloth, wall, glass etc.. Place the stencil design over the material and apply colour using dry brush on the surface of material (inside the stencil) or even otside the stencil design if you need some more difference in design.
Here is a sample design to show you how it looks.This is made by making a simple flower design and by following the above instructions.
Why only dry brush?
This is because if water is applied on the colour or brush there are chances the colour may spread around. So be careful to use only dry brush.
Now this is about normal brush when you need to paint inside the sencil, you can even try using diff materials for colouring the material with stencil.
Different tools you can try with:
1. Cotton (while using cotton just dip the cotton in the colour and dab it on the stencil the design will be on the material of its own)
2. Sponge
3. Toothbrush (spray it all over the stencil design)
Try this out using all these tools and see the results.
Here is a stencil painintg for you.Labels: Painting
Stenciling is one of the oldest and easiest decorative painting techniques. You can use stencil painting to decorate your walls, windows, doors and on. Anyone can make a stencil. This session i'll teach you Stencil Making.
Will start first with Stencil making without the help of any colours.
Materials used:
1. Thin cardboard (card paper)
2. Hardboard (preferably white cloth)
3. Trace paper
4. Scissors
5. Dark HB pencil
6. Fevicol
How to make:
1. Use thin cardboard and sketch a design, trace it to tracing paper, and cut it out with scissors or a craft knife. Lay the pattern on the felt cloth slightly larger than the pattern , trace the design and cut it out. Make sure to cut it very safely if the designs are too complicated.
2. Now apply fevicol on the hardboard and paste the cutout design over the hardboard.
You will need lot of patience to do this, but the result that comes will be really amazing.
Here is a beautiful Stencil making.
Labels: Craft
Beads work - this is very much similar to Zardosi work.
The materials used for bead work is same except the difference that we needs only beads for making this. We wont use any thred or sequences.
While making Zardosi we apply fevicol only on outlines and here we have to fill the beads all over the design and cover it completely.
Here is how the beautiful Bead work looks like.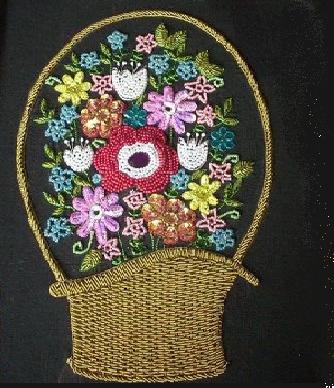
Labels: Craft
The Mughal Era in India brought richness to textiles and costumes by doing the Ari work or Zardosi work. Satin is known as Zardosi. Zardosi work is done by laying the color threads mostly gold threads over the material and giving a rich feel to Sarees and dresses.
They are always seen with a chain stitch , which is easily done with a zardosi needle and golden or silver colored threads.
This is all about Zardosi work on Sarees and Dresses, but today we will learn how to make a wall hangining out of Zardosi Materials.
Materials :
1. Felt Cloth
2. Design you wish to make
3. Trace Paper
4. Fevicol
5. Sequens and beads required for the design
6. Trace Paper
7. Hard board
How to start work:
1. Fisrtly trace the design on the felt cloth and apply fevicol on the outlines of the design.
*Remember* ONLY OUTLINES
2 Now paste the required sequences threads and beads whatever materials required for the design on the fevicol and a beautiful Zardosi Work is ready to frame.
You can add more of beads and threads to make the design bright and colourful.
Here is a dancing peacock made of Zardosi Work.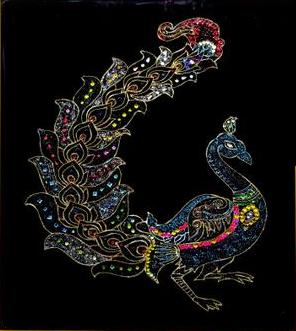
Labels: Craft
We will start with something interesting and simple to do. We'll learn how to make Cross Stitch Designs. Cross Stitch kit is easily available in all stores with the materials needed for making it. On the cross stitch design is printed on the fabric to follow. But there are cases where the fabric is blank and there will be a chart with instructions to put the stitches.
The chart is divided into grid of squares. Each colour is represented by a symbol, and there is a "colour key" which shows you which symbol represents each colour.
Assume that the symbol for Red is 'a' and the symbol for Yellow is 'b'. If you see a line of 8 squares on the chart containing the symbols 'aaaaabbb', you should make 5 stitches in Red and 3 stitches in Yellow.
Cotton threads are used for doing cross stitch. Cotton threads are made up of six strands. Separate these out into the correct number of strands (as indicated on the instructions in the kit) for stitching.
1. The fabric contains blocks with a hole at the corners of each block which is easy to work. To make one cross stitch, bring the needle up through hole 1, down through hole 2, then up through hole 3, and finally down through hole 4.
The below image will give you a proper idea of how the stitch looks.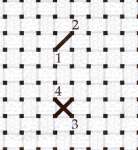 This is the main and basic stitch used for making cross stitch design.
There are more types of stitches which you can try out while you practise making a Cross Stitch.In this way you can complete the design using different colours of threads making the design more beautiful.
Here is how it looks.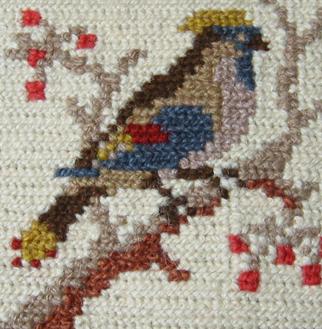
Labels: Craft
Fabric Painting is basically for any layman. Go creative by getting some colours and brush or any tool that you would like to try.
All u need is :
1. Cloth which you wish to design
2. Colours (Fabric colours, fevicryl)
3. Brush of different size
4. Trace paper
5. Good design (Majorly Floral designs as it suits the best in fabric if you wish to design your own cloth)
Firstly all you have to do is trace the design on the cloth. Colour the design using fabric colours and brush. to make it more beautiful you can add sequences and any decorative stuffs on the design.
*Important*
1. The cloth after painting should be kept aside for atleast 24Hours so that the design gets completely dry.
2. After the design get dry apply hot iron from the back side or there are chances the design may go after washing the cloth.
Are you creative enough, then try all kinds of designs you can without any trace paper or any ready made designs. If you are not good in drawing or don't have any design to make then try doing spray painting.
Its simple take any old toothbrush dip the brush in colours just spray it on the cloth and you can see various designs on it.
Try it and you will get amazing results.Labels: Painting
Tile painting. This is something that we can do to decorate our house. A plane kitchen tile or passage tile can be made more bright and colourful by Tile painitng.
Materials used:
1. Tile - anything of your choice
2. Colours - as required
3. Carbon Paper
4. Good design
Frist trace the design on the tile and make a outline of the design so that it won't rub off. Apply colours on the design as required, you can give different shades with different colours.
Tile painiting is the most simplest of all paintings as it can be done very easily.
Tile painitng can be made as much colourful you want,as it will look more bright and beautiful.
Here is a cool Tile painitng.
Labels: Painting
Now here i am back with something very very simple and very interesting to do.
Today's topic is Pot Painting.
Materials for Pot painting:
1. Pot- Any size and shape
2. Fabric Colours
3. White carbon
4. Design
If you are creative enough then no need of carbon and design you can directly start painting.
First is you need to clean the post well using dry cloth then apply any colour of your choice all over the pot or as u like using diffrent shades of colour to make it more colourful.
After the paint gets dry place white carbon trace the design on the pot and start colouring the design as per required or even if you have applied diff colours you can even keep the pot plain as it already got lot of colours.
Pot painting can be more creative just need is good imagination, good colour sense.
This is how a beautiful Pot Paintng looks. You can also make ceramic pot painting, you'll need some extra materials like Ceramic Powder and fevicol.
All you have to do is mix the ceramic powder and fevicol make a paste of it u can make flowers and or any figures as you wish with creamic.
Here is a beautiful ceramic painitng.
Labels: Painting
A new creativity to show you all. This is Solawood Flower Making. Solawood is Tapioca peel, used for craft purposes. We are making a flower basket, with very attractive solawood flowers. Its totally a different kind of Art, Tapioca peel is something that we just throw away without thinking that something creative can be made out of it. Solawood is available to all art stores.
Materials Used:
1. Solawood - about 20 rolls
2. Thermocol - 1/2 meter
3. Hard Board -2 1/2 meters
4. Cloth - Cotton/Felt
5. Glue
6. Scissors
7. Carbon
8. Cutter
How to make:
Draw a basket on the thermocol and cut the basket shape using cutter. Remove all the chipped out portions.
Now your basket on thermocol is ready.
Take a hard board. Cover it with the black velvet/felt cloth. Your hard board should be of appropriate size, so that your thermocol basket can be properly stuck to the board. Now paste the thermocol basket on the hardboard.
Make a ‘weaving’ design on the thermocol basket with solawood.
Basket Making :
1. Cut the sola wood into strips of even length and width of approximately 1-2cm x 1-2cm. Each piece can be stuck on the design of the basket lengthwise and breadth wise.
2. You can also make a different design. Take two solawood strips and weave into plaits as you plait your hair. Make enough plaits to cover the basket. Take each plait and fix them horizontally on the basket
Flower Making:-
Cut the solawood in the shape of petals. Cut the petals of 3 different sizes approximately 200 -300 in nos.
Take a small petal. Roll it and paste each petal one by one as of making flower. Try not to tie the solawood as you do while making flowers of cloth or paper, since solawood is a fragile material. Arrange 5-7 petals around it and each petal should be pasted with fevicol.Make around 50-60 flowers of different sizes. Also cut solawood into leaf shapes, make around 30-40 leaves.
How to Arrange the Flowers:
Paste the flowers and leaves on the top portion using glue, just above the basket.
Arrange the flowers in such a way that it should look as if the flowers are arranged from inside the basket.
*To make it more attractive you can also add colour to basket and flowers as per required.*
This is how a beautiful Solawood Flowers looks.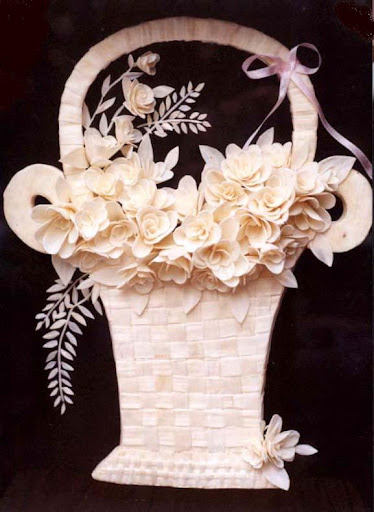
Labels: Craft
Today i'll start with something different and very exciting. Sand Emboss Painting. This is a very simple and beautiful art.
All u need to do is follow the procedure of Emboss painting, but after the design gets embossed we need to add sand on the design.
Will explain you in detail how is this done.
Materials Required
*Use the materials needed for emboss painting for the base design.*
1. Sand-various colours
2. A good design
3. Trace paper
4. Fevicol
5. Water Colours
6. Varnish
First trace the design on the black velvet cloth. Apply emboss solution as said in the emboss painting.
Apply fevicol to the design on the area that needs the same colour, sprinkle the coloured sand on it. Leave it for a minute and then reverse it on a paper, so that the excess sand will be removed. The sand sticks only on the area where fevicol is applied.
In the same way apply fevicol and sand on the whole picture.
You can even use water colours to give shades for the design or if the sand colour looks dull.
Giving water colours coat makes the painting look bright and lively.
Give it a coat of varnish after the whole painting gets dry.
A beautiful Sand Emboss Painting is ready
Labels: Painting
Nib Painting as the name itself using nibs. There are three types of Nib used for Nib painting.
1. Rounded tip to do circle designs
2. Long tip to do lines
3. Short pointed tip to draw small sharp lines.
Other Materials:
1. Design - you wish to paint
2. Felt Cloth
3. Hard board
4. Oil paint
5. Tracing Paper
6. Pencil Carbon
7. Glue
You will also get Nib painting kit which has all the materials you need.
Firstly stick the felt on the hard board using glue. Then use white carbon paper to trace the design on the felt. Apply paint on the design as required.
Make sure you always start painting from top so that your hand can be moved easily downwards. Also make sure hand should be moved evenly for the real look.
You should decide on the color scheme. Usually floral designs and scenery go well with Nib painting. Select the shades as per the design and if you mix two colors to get the double shade combination it will look really good.
You can also take the paint on the nib and press it against the surface to create the design.
If a round design is required use the nib with a round tip. Wherever you need small sharp lines you can use a short pointed-tip nib. Long tip nib is used to draw the lines.
It may take 2-3 days or more to finish off with a good design.
The design will dry off very slowly. It might take ten days or more as consistency of the paint is very thick.
The felt can get dirty but can be easily removed with thick dry brush or a tooth brush.
This painting looks really beautiful after it is completed, but need lot of patience as it is time consuming.
Floral designs are very common among Nib Painting.
Here is a beautiful Nib Painting.
Labels: Painting
This is Rim Zim painting, can say as easy as Emboss painting.This painting is simple but time consuming too.
There are lot of people who don't know about Rim Zim painting. So let me help you out how can you make a beautiful Rim Zim painting.
Rim Zim means "Sparkle" that doesn't mean using sparkle colours. Here is how u can can make Rim Zim painting in just few simple steps.
1. White Canvas Cloth
2. Black colour thin marker pen
3. Glass paint Colours
4. Trace paper with design you like
5. white multi colour Sparkle powder (do not use colourful sparkle powder and powder should be very fine)
6. Fevicol (or any glue)
How to make Rim Zim painting?
Firstly trace the design on the cloth using black marker pen (thin marker).
Apply fevicol all over the white cloth and spread the sparkle powder over the fevicol and allow it to dry completely.
(Coloured sparkle powder should not be used as the design will not be visible so it should be white multi colour powder.)
After the whole thing gets dry you can apply glass paint colour on the design as per your requirement.
As the design is you can decorate it with beads and sequences.
Why to use only glass paint colour ?
This is because if we use fabric colour, water colour or any other colour the sparkle effect wont be much.
Glass paint colour is transparent colour which give the sparkle effect of the painting.
Here is a beautiful Rim Zim Painting.
Labels: Painting
This is Emboss Painting i started with when i started painting. You don't need any special talent to do this.
Anyone who doesn't know drawing can do emboss painting.
All u need is a black Velvet cloth, emboss solution, colours (fabric pearl colours for good finish), brush and trace paper with any designs of your choice.
Just 5 simple steps for a beautiful emboss painting.
1. Trace the design u want on the velvet cloth.
2. Mix the emboss solution with water in the proportion of 3:2.
3. Paint the solution all over the design and wait for 24 hrs to get it dry.
4. After 24 hrs apply hot iron on the back side of velvet cloth (plain side).
5. Now can use the paint the designs using pearl colours as per the requirement of the design.
U can get materials for Emboss painting very easily in any Art store..
Enjoy Playing with colours.
Labels: Painting
Glass painting is one such unique painting which is laid down on the back of the glass, and painted from the reverse.
Glass painting basically involves painting on tinted (stain) glass.
To make Glass painting all u need is :
1. Stained Glass
2. Black tube colour (for out line design)
3. Trace paper with design of your choice
4. Glass paint colours
5. Brush (Thin brush #1-2)
6. Silver foil (if required)
Now put the trace paper on a flat surface keeping back side of glass in front. Make outline of the design using black tube colour.
Allow it to dry for 24 hrs then apply glass paint colour as per requirement. Make sure there wont be any bubbles on the glass while applying the colour as it doesn't give good effect on the glass paint.
While applying colour if there are bubbles on the glass use brush to remove it by spreading the colour with water.
Now if required you can use crushed silver foil on the back side of the glass for a different effect and can frame it.
A beautiful glass paint is ready.
Labels: Painting
Warli painting, one of the most beautiful forms of Indian folk paintings. It generated from a small tribe called "Warla" living in Maharashtra, India. These paintings are done on mud walls. These tribal paintings shows expressions of folk life, customs and beliefs. Each painting is a scene that contains various elements of nature including people, animals, trees, hills, birds, squirrels, monkeys, snakes and other animals are frequently used. These paintings do not use straight lines and instead the lines are made by using dots and dashes and geometric shapes basically triangles for making human and animal figures.
Warli paint needs only one colour i.e. WHITE. These folk artists use rice flour paste as their medium for white colour.
U can easily get mud for making Warli paint and use handmade paper for better effect of painting. Most important part u need to know the Warli traditions and cultures as the painting shows all those.
This picture below shows all forms of warli painting, u can see "Tapra dance" in this painting. This is a traditional festival dance among the tribes.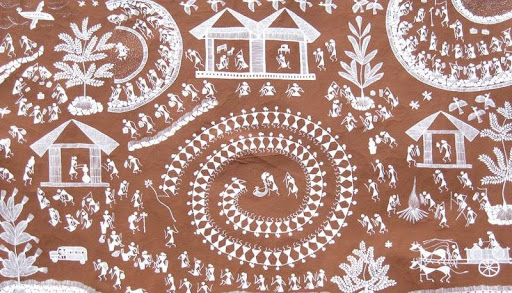
Labels: Painting
This is a new work on Emboss Painitng.
Labels: Painting


